Stokes asked about how I built my "wild west" buildings. They are somewhere in storage right now, so I can't get at them to get measurments, but I've got a few photos that give some clues as to how I built them.
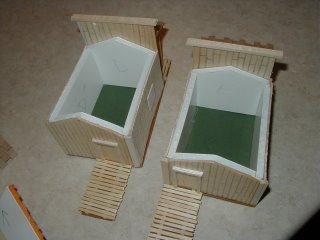
 First of all, as the first photo shows, the "framework" was made out of foamcore. This was then clad with sheet balsa.
This means that I tended to use "even inches" for either wall widths or heights. Primarily I used a lot of 2", 3" and 4" measurements (and occassionally 5" or 6" by using a pair of pieces) because that is the width of the balsa that I had access to.
The base (green floor) was made from the kind of cardstock that you get as "scraps" from "framing shops". It gives a base not only for the building, but also for the slatted "sidewalks" in front and behind the buildings.
If you "click" on the photos (to get a larger photo), you will see that the "planking" is simply scribed (using an old dull pencil) into the soft balsa.
I was surprised at how good this actually looks. Once again, as is so often the key in the look of the "tabletop", what can be seen from 3 feet away is what's important -- not what you see from 3 inches.
The doors were simply "framed" with scrap balsa; and the windows were clipped from craft sticks (like tongue depressors or popsickle sticks). These were simply glued onto the sheet balsa of the walls.
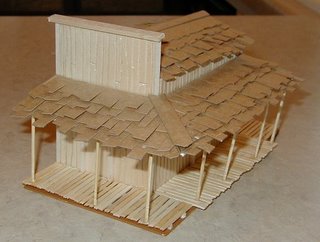
 Moving on to the second photo, you will be able to see some other details.
The sidewalks were made from some "craft toothpicks" that I got at a local "craft store". I simply cliped the "fat" and "pointy" ends off (I used toenail clippers if you need to know). I then cut them to whatever length was needed.
The sidewalks are resting on some balsa strip "runners" to raise them up over the cardstock ground base (suitably painted as "dirt").
The "posts" that hold the roof up are made from those "gourmet" toothpicks that you can often find in stores -- the ones made from bamboo that have one pointy end and the other has a sort of filial carved flat end. (note -- these are also useful as flagstaffs for 28mm figures).
The roofs were made with from a "base" of the same sort of cardstock that I used for the ground base. On top of this, I made "shingles" from the light cardstock of cereal boxes.
I would cut strips of it, then cut into one side of it making a sort of "comb" (cutting most of the way through from one side). I would then clip the "teeth" of comb so that they were very irregular in length.
Again, if you "click" on the photo, you can see what I mean on the larger image. I found that about four strips glued onto the base, with a light cardstock cap-piece made a good looking roof . . . and it is very easy to make and costs nothing except some time (which can be while you are watching TV).
Anyway, Stokes, I hope that that helps you understand how these buildings were made.
-- Jeff
4 comments:
Hello again Jeff,
Yes, thank you. It was very interesting to read about your building methods, which produce some of the best looking old west buildings I've seen. DIscussing modeling technique is almost as interesting to me as discussing painting techniques. And it's always useful to expand one's own bag of tricks by reading about how the other guy does it. Thank you again!
Best Regards,
Stokes
Stokes,
Thank you for the compliment, sir. With my fuzzy-headed cold, your questions gave me something to post.
-- Jeff
Great looking buildings Jeff.
Always admire someone with the ability to make good terrain items. It's an underrated ability in our hobby I find.
Thank you, Paul.
For me the overall diarama of the tabletop is important. I feel saddened when I see beautifully painted figures on one of those tabletops where the terrain is just a rectangular pieces of construction paper.
So often people spend a lot of time and money getting their troops to look good . . . and then ignore the look of the rest of the table. I'm not saying that everything needs to be perfect; but I like it when people make an effort.
Perhaps this is worth a post.
-- Jeff
Post a Comment