A Question of Imaginary Countries? --
What are your favorite "imaginary" countries from Literature?
I must confess that, for me, Ruritania (of "Prisoner of Zenda" and "Rupert of Hentzau" fame) has always been a favorite. And, of course, Leonard Wibberly's whimsical "Duchy of Grand Fenwick" is another.
What about you? What imaginary European countries do you like from Literature (as opposed to wargaming)?
Since this blog is primarily about my imaginary 18th century country of Saxe-Bearstein, I'd like to know what other imaginary countries have tickled people's fancies.
-- Jeff
Sunday, October 29, 2006
Thursday, October 26, 2006
A Simple Campaign Format --
Here is a simple format for a two-person campaign that requires little bookkeeping. It is particularly designed to encourage the building of new units.
 Featured above is the "campaign map". The two armies (blue and red here) first meet in the white circular area.
This should be an even battle with similar forces . . . for the 18th century, this might be something like four battalions of Infantry, one regiment of Cuirassiers, one regiment of Dragoons and one Medium Artillery Piece each, with comparable (mainly mid-range) morale.
All troops "lost" in each battle are diced for at battle's end. Dice by "stands" (or even individual figures, if that's how they're based) rather than by whole units.
The winner has a 2/3rds chance of recovering each lost stand (anything but a 1 or 2 on each d6); while the loser of the battle only has a 50% chance of recovering each lost stand (he needs a 4, 5 or 6 on each d6). These losses need to be retained for the next battle.
Note that, even if a unit is completely destoryed, it still gets to dice for each stand to recover. If such a unit fails ALL of its rolls and is completely "wiped out", it is considered to be lost for the remainder of this campaign.
In addition, each winner of any battle selects one unit to improve a morale grade and the loser selects one unit to drop a morale grade. This allows you to "reward" good units and "punish" those that disappointed.
For subsequent battles, the loser will get reinforced by one new unit (although losses will remain from previous battle or battles). The exception to this is if you are forced back to your own "Area B", where you have your choice of either a new unit OR bringing all of your current units up to full strength instead.
Any winner of two consecutive battles may also be re-inforced with a new unit OR may choose instead to bring his current units up to full strength.
If you are pushed back to your "Area C", you get to both get a new unit AND to bring your current surviving units up to full strength.
If pushed back to your Capitol, you get to add one guard-class unit and a heavy gun -- however, you've exhausted your reserves so you don't get to bring any "wounded units" back to full strength.
So, there you have it . . . a simple campaign format that encourages unit building. (By the way, there should be a prior agreement as to the morale grade of new units -- I would suggest either veterans or green units depending upon your preferences).
-- Jeff
Monday, October 23, 2006
The Madness of It All --
Here I am -- in a situation where I am unable to paint for some time to come -- and I have lots of lead to paint. I have four 26-man Battalions, four 13-horse Regiments, four Artillery pieces, and a bunch of Generals . . . .
. . . So, what am I thinking of . . . right, ordering more lead for my Saxe-Bearstein army!
Does anyone else do this?
Does anyone else want to order more lead when they haven't yet painted what they already have (which will be more than sufficient for a fair while)? Am I alone in this madness? Or are there more of us "lead junkies"?
-- Jeff
Thursday, October 19, 2006
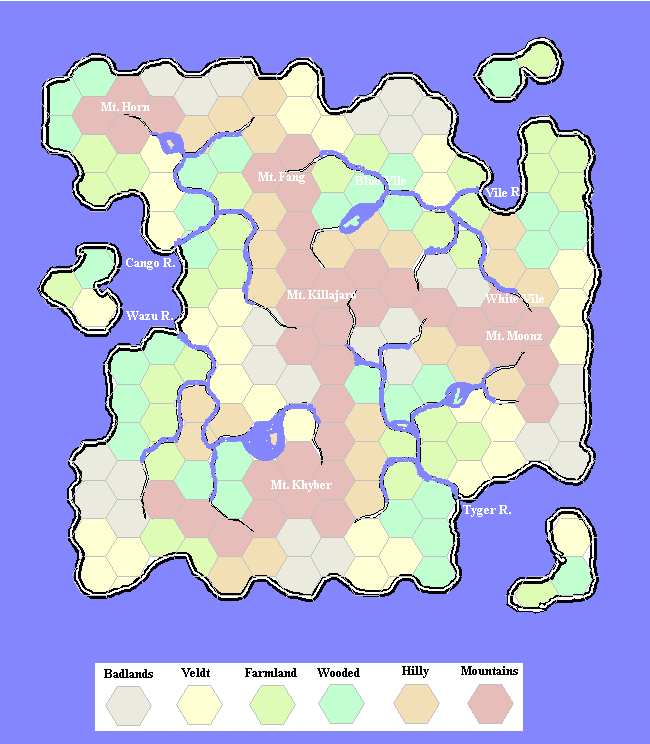
An Old Campaign Map --
What you see (and you can see it better if you click on it) is a campaign map I made some years ago.
The names are all quasi-German and it is quite suitable for an imaginary campaign. The names, by the way, were mainly created simply by changing the first letter of some current German cities.
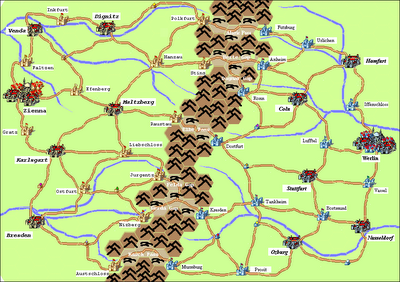 Gentlemen, if you look closely, you will see that each of the two "countries" has a capitol (Zienna and Werlin), five large cities and 13 smaller forts.
There are five passes through the mountains two of which are a sort of "doubled" pass.
If you look closely, you should be able to see faint green lines crossing the various roads. These are, in fact, the remains of a "hex grid"; but we used them as time markers for various troops using the roads.
You, of course, are welcome to appropriate this map for your own campaings, applying whatever rules seem appropriate to you. This is not the map we will be using for the "Wars for Arcadian Glory" because they will involve more countries.
Anyway, I plan to use a mapless system for the WAG conflicts.
-- Jeff
Tuesday, October 17, 2006
More Auerstadt Photos --
Yes, I know. These are not connected to my mid-eighteenth century Saxe-Bearstein project . . . but Murdock presented such a wonderful re-creation of the Napoleonic "Battle of Auerstadt" that I thought I should post a few more photos.
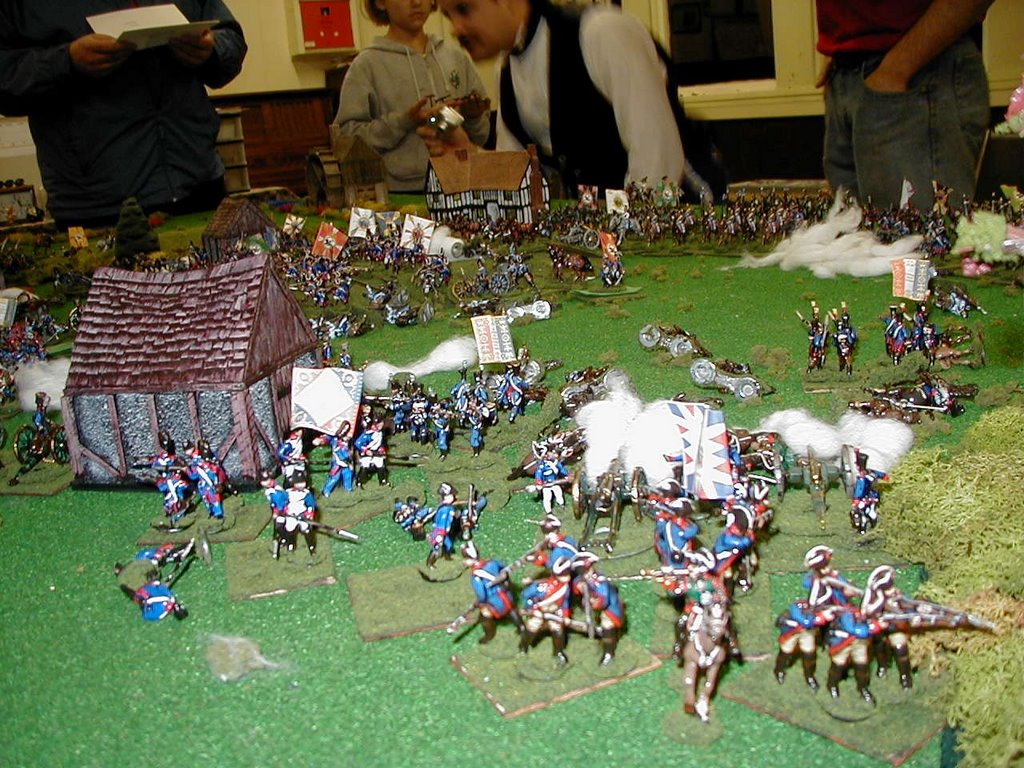
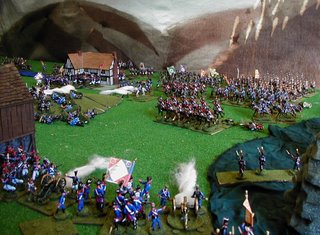
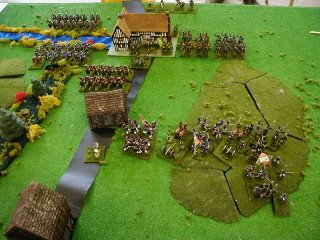 The first photo gives a quick glimpse of the battlefield in the morning when the fog lifted and suddenly the French (bottom of photo) and Prussians (top of photo) discovered that they were facing each other.
Remember, you can "click" on any photos to get a close-up look at it.
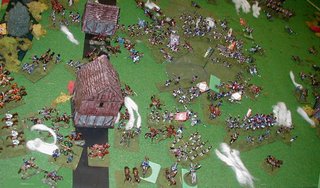 The next photo is an "overhead" shot of the aftermath of some of the fighting on "the hill". Murdock uses tiny neodymium (sometimes called "rare earth") magnets on his bases, along with washers on the bottoms of his figures. This allows him to "leave the dead where they lie" as the battle progresses.
The puffs of cotton indicate fired artillery. One is added (to a maximum of three) each time a gun is fired. One is removed each turn the gun doesn't fire. When a gun has three smoke puffs in front of it, it is deemed to shoot at a -1 due to reduced visibility.
Please note that this is not in the normal SHAKO rules, but he uses it to force players to consider their choices. In my "Tricorne Wars" rules, I handle artillery very differently -- but that will be the subject of another post. (Note that I just made a Saxe-Bearstein connection!)
 A further thing to note are the "pale green folders" under a pair of messengers at the bottom of the photo, as well as one under a figure on the hill and another under a Prussian at "one o'clock".
These are changes of orders. The magnetized bases allow them to be placed underneath the figure.
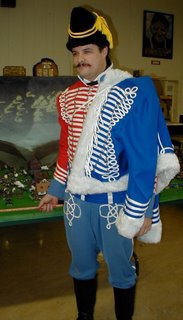
The next photo should please Stokes . . . yes, it is Murdock himself in his Hussar's uniform.
Please note that he not only wore it for us, but in public as well when we visited the local grocer mid-battle to get something to eat.
The observant among you might note that he's holding an "artillery stick" in his right hand.
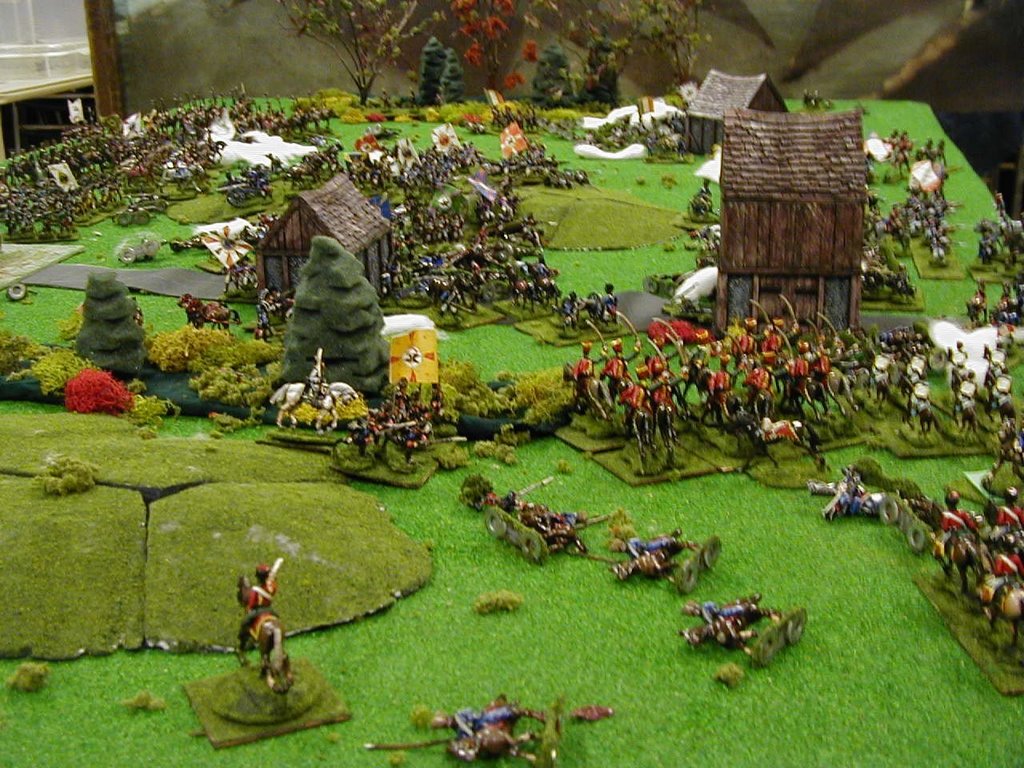
 The fourth photo is from the French right flank where Mike had to face several assaults. By the way, you can see some of the washers on the base of some "dead cavalry" if you look closely.
The final photo is near the end of the battle. It shows the opposite flank, looking down the table. Note that yet another wave of Prussians has just arrived . . . but too late, as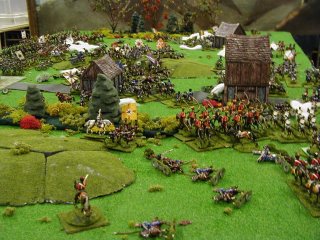 the Prussians had failed a Division morale check that put them into retreat.
I've never been seduced by the reputed allure of this period . . . it just doesn't have the romance for me that it does for so man. Nevertheless, I will admit that this was quite a battle to participate in.
-- Jeff
Yes, I know. These are not connected to my mid-eighteenth century Saxe-Bearstein project . . . but Murdock presented such a wonderful re-creation of the Napoleonic "Battle of Auerstadt" that I thought I should post a few more photos.
 The first photo gives a quick glimpse of the battlefield in the morning when the fog lifted and suddenly the French (bottom of photo) and Prussians (top of photo) discovered that they were facing each other.
Remember, you can "click" on any photos to get a close-up look at it.
 The next photo is an "overhead" shot of the aftermath of some of the fighting on "the hill". Murdock uses tiny neodymium (sometimes called "rare earth") magnets on his bases, along with washers on the bottoms of his figures. This allows him to "leave the dead where they lie" as the battle progresses.
The puffs of cotton indicate fired artillery. One is added (to a maximum of three) each time a gun is fired. One is removed each turn the gun doesn't fire. When a gun has three smoke puffs in front of it, it is deemed to shoot at a -1 due to reduced visibility.
Please note that this is not in the normal SHAKO rules, but he uses it to force players to consider their choices. In my "Tricorne Wars" rules, I handle artillery very differently -- but that will be the subject of another post. (Note that I just made a Saxe-Bearstein connection!)
 A further thing to note are the "pale green folders" under a pair of messengers at the bottom of the photo, as well as one under a figure on the hill and another under a Prussian at "one o'clock".
These are changes of orders. The magnetized bases allow them to be placed underneath the figure.
The next photo should please Stokes . . . yes, it is Murdock himself in his Hussar's uniform.
Please note that he not only wore it for us, but in public as well when we visited the local grocer mid-battle to get something to eat.
The observant among you might note that he's holding an "artillery stick" in his right hand.
 The fourth photo is from the French right flank where Mike had to face several assaults. By the way, you can see some of the washers on the base of some "dead cavalry" if you look closely.
The final photo is near the end of the battle. It shows the opposite flank, looking down the table. Note that yet another wave of Prussians has just arrived . . . but too late, as
 the Prussians had failed a Division morale check that put them into retreat.
I've never been seduced by the reputed allure of this period . . . it just doesn't have the romance for me that it does for so man. Nevertheless, I will admit that this was quite a battle to participate in.
-- Jeff
Monday, October 16, 2006
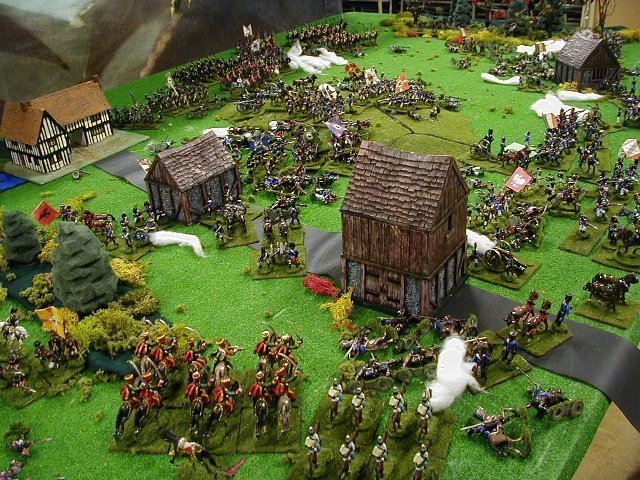
Auerstadt 200th Anniversary Game
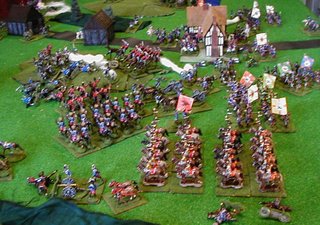
This past Saturday, Murdock (see blog address in my Links) put on a wonderful refight of the Napoleonic battle of Auerstadt on the 200th Anniversary of that battle.
I'm looking at the nice little trophy that he presented me for guiding the French to victory.
"Victory", all I was trying to do was to survive! I felt under incredible pressure all day as wave after wave of Prussians kept showing up. It was very stressful.
 Of course, David Dinney (who commanded the Prussian side) felt equally stressed as he tried to co-ordinate his Prussian side.
He was also a tad handicapped in that he had three "part-time" players on his side; instead of Mike Pearce who was by my side the whole time . . . and whose final charge was the straw that finally triggered the Prussian withdrawal.
We used what Murdock calls his "Shako and Baton" rules. Essentially they are SHAKO with some battle-specific modifications that added greatly to the "fog of war" and the fun and uncertainty of the situation.
Kudos to everyone who participated; but especially to Murdock. Not only did he provide all of the troops and terrain used; but he also was attired in full Hussar uniform.
The photo above is from the flank where Mike's cavalry charge finally turned the tide. (Note: "click" on it for a better view).
A great game (and I'm not fond of Napoleonics)!
-- Jeff
Saturday, October 14, 2006
"Afristan" Colonial Campaign Map --
Unfortunately, our move to Canada stifled a 19th Century Colonial Campaign that I was set to run.
The players were to explore (and exploit) the newly-discovered mini-continent of "Afristan", set in the Indian Ocean.
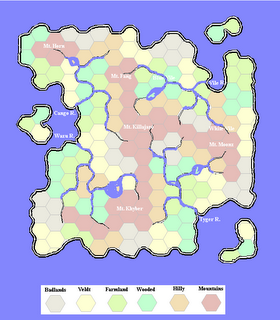 Seen at left is the "basic" map of Afristan. It shows the terrain but does not indicate any native settlements.
Afristan has four major river systems -- the Wazu, Cango, Vile and Tyger rivers. And five major mountains -- Mt. Horn, Mt. Fang, Mt. Moonz, Mt. Khyber and the centrally located Mt. Killajaro.
There are at least a dozen different native tribes inhabiting this continent -- the Afcans, Bintu, Derfish, Fozzi, Ghuzi, Kunda, M'bele, N'zulu, Pashan, Raff, Tuwazi and Wapago . . . . however, there are rumors of other mysterious tribes in Afristan's mountains.
I had four players lined up and ready to go. The German was going to explore the Cango; France, the Wazu; Turkey, the Vile; and the British player was headed up the Tyger.
Perhaps, after we finally get settled down, I'll look into running this campaign again.
On another note, Murdock's bing Auerstadt refight is next on the agenda. Hopefully some pictures with tomorrow's post.
-- Jeff
Friday, October 13, 2006
"Tricorne Wars" Command & Control
While I am still "playing around" with the details of my "command and control" system for my "Tricorne Wars rules, I do not expect the basic concept to change.
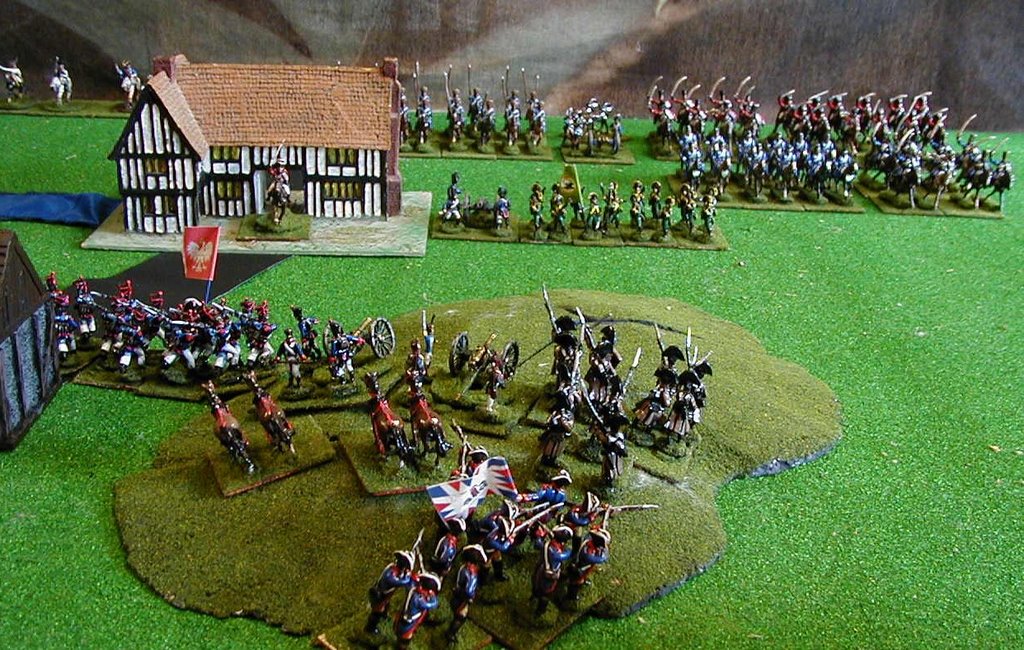
 As you can see from the picture at left, Brigadiers often have to tell the troops under their command were to go and what to do.
This does not always coincide with what the General in charge of the battle wanted.
"Why?"
Because the brigadier on the spot knows more about his immediate situation than some general overlooking the whole battlefield.
Besides, one of the touchstones of "Tricorne Wars" is a lack of certainty about what's going to happen. So, how do I accomplish this?
In "Tricorne Wars", all generals and brigadiers will have one of four "personalities":
Now, the "matrix" for brigadiers might look something like this:
die roll___careful___steady__aggressive__political
7________+1d3____+1d3_____+1d3_____+1d3
6________+1/h____+1/h____+1d3/h_____hold
5_________0________0______+1________0
4_________0________0_______0________0
3_________0________0_______0________0
2_________-1________0_______0________0
1________-1d3/h____-1/h_____-1/h______hold
0________-1d3_____-1d3_____-1d3______-1d3
So, you have some questions, right? "What does this chart mean?"
Well, the green numbers indicate how many "rungs" up the "Order Ladder" the orders are re-interpreted to. Likewise, the red numbers indicate how many rungs down the ladder the orders are re-interpreted to.
The purple "/h" only comes into play if the superior officer giving the orders is "political"; if he is, there is a 50/50 chance that instead of the orders moving up or down, they will default to "Hold" as the brigadier sends for clarification (just because they're related to the monarch doesn't mean they make sense).
"Okay, but what about the "0" and "7" lines?"
Even the Commanding General has a "personality". In order to "enforce" this, all commands by a "Careful" general will automatically have a +1 added to the d6 roll on the chart; and all commands by an "Aggressive" general will automatically have -1 added to the d6 roll on the chart for interpretation.
Now, since this roll is not made until contact is made with the enemy, the Careful C-in-C will be tempted to write more cautious orders for fear of their getting interpreted too aggressively . . . and, likewise, the Aggressive C-in-C will be tempted to give more aggressive orders for fear of their getting interpreted too cautiously.
You've already seen that the Political C-in-C has the danger of his orders needing clarification. So, of course, everyone wants a "Steady" C-in-C (even though his orders could be interpreted up or down).
Never fear, there's a mechanism to balance this as well.
Remember, "Tricorne Wars" is designed for "Imaginary Countries" and resulting fictional campaigns. Each country will come with a set of four Generals and six Brigadiers (although unique figures are not needed for each officer).
Here, for example, are the four generals and six brigadiers of the Saxe-Bearstein army:
This is to balance the fact that for smaller battles, the more senior generals are unlikely to be called out. In fact, the plan is that before each battle, the players will dice to see which general and which brigadiers the monarch has chosen to send.
(Note -- for small battles, roll 50/50 for the two Major Generals; for slightly larger fights, include the Lt. General; and for larger battles dice for all of them -- and for Wing Commanders if large enough. The senior general is always the C-in-C. If your monarch is one of your generals, he should be the senior.)
When generals and brigadiers are "rolled up" (in front of your fellows, please), besides picking or rolling for the order of your personalities, roll 2d3 and 3dAv.
(Note that "averaging dice" are numbered 2,3,3,4,4,5 -- if you need to use a d6, count the six as a 4 and the one as a three -- this is the easiest way to modify a d6).
The lower of the 2d3 is that officer's Initiative. The total of the 3dAv is his Command Radius if mounted. For brigadiers, please also note the total of the two lowest averaging dice -- this is their command radius if commanding an Infantry Brigade.
Hopefully this will have given you some idea of how I hope to instill some "fog of war" into the "command and control" aspect of "Tricorne Wars".
-- Jeff
While I am still "playing around" with the details of my "command and control" system for my "Tricorne Wars rules, I do not expect the basic concept to change.
 As you can see from the picture at left, Brigadiers often have to tell the troops under their command were to go and what to do.
This does not always coincide with what the General in charge of the battle wanted.
"Why?"
Because the brigadier on the spot knows more about his immediate situation than some general overlooking the whole battlefield.
Besides, one of the touchstones of "Tricorne Wars" is a lack of certainty about what's going to happen. So, how do I accomplish this?
In "Tricorne Wars", all generals and brigadiers will have one of four "personalities":
- Political -- they're related to the monarch (what can you do?)
- Agressive -- typical cavalry commanders, they want to charge
- Steady -- usually dependable, you wish there were more of 'em
- Careful -- they seldom act precipitously, a bit cautious
- ASSAULT
- ATTACK
- ADVANCE
- DEFEND or HOLD
- DELAY
- WITHDRAW
- RETREAT
Now, the "matrix" for brigadiers might look something like this:
die roll___careful___steady__aggressive__political
7________+1d3____+1d3_____+1d3_____+1d3
6________+1/h____+1/h____+1d3/h_____hold
5_________0________0______+1________0
4_________0________0_______0________0
3_________0________0_______0________0
2_________-1________0_______0________0
1________-1d3/h____-1/h_____-1/h______hold
0________-1d3_____-1d3_____-1d3______-1d3
(Note -- there has to be a better way of making a chart in a blog)
So, you have some questions, right? "What does this chart mean?"
Well, the green numbers indicate how many "rungs" up the "Order Ladder" the orders are re-interpreted to. Likewise, the red numbers indicate how many rungs down the ladder the orders are re-interpreted to.
The purple "/h" only comes into play if the superior officer giving the orders is "political"; if he is, there is a 50/50 chance that instead of the orders moving up or down, they will default to "Hold" as the brigadier sends for clarification (just because they're related to the monarch doesn't mean they make sense).
"Okay, but what about the "0" and "7" lines?"
Even the Commanding General has a "personality". In order to "enforce" this, all commands by a "Careful" general will automatically have a +1 added to the d6 roll on the chart; and all commands by an "Aggressive" general will automatically have -1 added to the d6 roll on the chart for interpretation.
Now, since this roll is not made until contact is made with the enemy, the Careful C-in-C will be tempted to write more cautious orders for fear of their getting interpreted too aggressively . . . and, likewise, the Aggressive C-in-C will be tempted to give more aggressive orders for fear of their getting interpreted too cautiously.
You've already seen that the Political C-in-C has the danger of his orders needing clarification. So, of course, everyone wants a "Steady" C-in-C (even though his orders could be interpreted up or down).
Never fear, there's a mechanism to balance this as well.
Remember, "Tricorne Wars" is designed for "Imaginary Countries" and resulting fictional campaigns. Each country will come with a set of four Generals and six Brigadiers (although unique figures are not needed for each officer).
Here, for example, are the four generals and six brigadiers of the Saxe-Bearstein army:
- General Baron Helmut von Pilsner (Agr), init 3 -- 10"
- Lt. Gen. Hertz von Stout (Stdy), init 1 -- 14"
- Maj. Gen. Otto von Lager (Care), init 1 -- 9"
- Maj. Gen. Kronprinz Rudolf von Ursa (Pol), init 2 -- 12"
- Brig. Karl von Blatz (Agr), init 1 -- 11" / 7"
- Brig. Ernst von Bruin (Stdy), init 1 -- 11" / 6"
- Brig. Dieter von Maltz (Care), init 2 -- 10" / 5"
- Brig. Prinz Gunther von Ursa (Pol), init 1 -- 12" / 8"
- Brig. Fritz von Hoptz (Stdy), init 2 -- 10" / 6"
- Brig. Wolfgang "Bud" von Weiser (Agr), init 1 -- 13" / 8"
This is to balance the fact that for smaller battles, the more senior generals are unlikely to be called out. In fact, the plan is that before each battle, the players will dice to see which general and which brigadiers the monarch has chosen to send.
(Note -- for small battles, roll 50/50 for the two Major Generals; for slightly larger fights, include the Lt. General; and for larger battles dice for all of them -- and for Wing Commanders if large enough. The senior general is always the C-in-C. If your monarch is one of your generals, he should be the senior.)
When generals and brigadiers are "rolled up" (in front of your fellows, please), besides picking or rolling for the order of your personalities, roll 2d3 and 3dAv.
(Note that "averaging dice" are numbered 2,3,3,4,4,5 -- if you need to use a d6, count the six as a 4 and the one as a three -- this is the easiest way to modify a d6).
The lower of the 2d3 is that officer's Initiative. The total of the 3dAv is his Command Radius if mounted. For brigadiers, please also note the total of the two lowest averaging dice -- this is their command radius if commanding an Infantry Brigade.
Hopefully this will have given you some idea of how I hope to instill some "fog of war" into the "command and control" aspect of "Tricorne Wars".
-- Jeff
Tuesday, October 10, 2006
A Very Pleasant Surprise --
Today (Monday) was Thanksgiving Day here in Canada . . . and for me it has ended with a very pleasant surprise. Some British gamers tried out an early version of "Tricorne Wars" and sent me a report.
The very first sentence of their email gave me great pleasure -- "We gave these rules a try last night and had quite a lot of fun."
They then followed up with a number of questions . . . which pointed out to me a number of things I had failed to cover . . . (thank goodness for playtesting)!
They also asked if they had interpreted certain things correctly (they had); and criticized the (lack of) organization to the rules. I certainly had to plead guilty to that one. Currently they are in a sort of "stream-of-consciousness" state of disorganization -- more or less written down as I thought of things.
Finally, they commented on several things that they really liked about the rules . . . and these were, in fact, the key heart of "Tricorne Wars". This made me really happy; and very thankful for a group of gamers in the United Kingdom.
I'm hoping that someone took a few photos and/or will send me an account of the battle . . . but whether that happens or not, please allow me to say a hearty "Thanks, guys!" to them.
-- Jeff
Saturday, October 07, 2006
"Cohesion" in Tricorne Wars --
I have already (September 27, 2006) somewhat discussed "Morale Grades" in my SYW rules, Bluebear's "Tricorne Wars".
Today I wish to discuss "cohesion". Essentially, a unit's "morale grade" is an abstraction of how well they adjust to adversity. "Cohesion" is a measure of some types of that adversity.
Perhaps the easiest cohesion state to understand is "Separation". If a unit is in skirmish order, its component elements (stands) are "separated". The unit is in a state of Separation. But a unit is also in Separation if they are in terrain that has temporarily disrupted their normal order.
In both of the above-mentioned examples of "Separation", that state ends when the factor causing it ceases to be. If a skirmishing unit returns to a solid line; or a unit in "separating terrain" leaves it, "Separation" ends.
However, Separation is a cohesion state that exists separately and along side the other cohesion states. These other states are:
- Good Order -- your best cohesion; all set to follow orders and fight
- Rattled -- minor loss of cohesion
- Disordered -- more serious loss of cohesion; like Separation, but not cessation-cured
- Shaken -- very serious loss of cohesion; unit is in bad shape; needs to rally
- Broken -- all you can do is rout and hope that you can rally them
Colour stands
I hate little bits of colored pipe cleaner, cardboard chits, casualty caps, printed labels and various other ways which some games use to indicate a unit's status -- such as their current "cohesion".
Therefor, in "Tricorne Wars", I urge the use of "colour stands" to indicate the unit's current cohesion. It is a simple, yet effective way of showing it on the tabletop without destroying the visual impact of the battle.
In "Tricorne Wars", the unit's "command stand" will contain figures of an officer and musician -- but not any flags. The flags (or more appropriately, "colours") are mounted with their bearer by themselves on a full width (but often reduced depth) stand.
The position of this "colour stand" in relation to the rest of the unit determine's the unit's current cohesion:
Artillery is a bit of a different problem. Flags don't look right with artillery pieces . . . so I use a "Gun Captain". This is some sort of distinctive "artillery figure" mounted separately (rather than on the gun stand). His position (in front, beside, behind, etc.) can be used to show the current cohesion of the gun crew.
Note that those who object to flags with skirmishers may do a similar thing as long as it is clearly identified to your opponent.
Anyway, that's what I'm doing for Bluebear's "Tricorne Wars" . . . perhaps it will give you some ideas as well.
-- Jeff
I hate little bits of colored pipe cleaner, cardboard chits, casualty caps, printed labels and various other ways which some games use to indicate a unit's status -- such as their current "cohesion".
Therefor, in "Tricorne Wars", I urge the use of "colour stands" to indicate the unit's current cohesion. It is a simple, yet effective way of showing it on the tabletop without destroying the visual impact of the battle.
In "Tricorne Wars", the unit's "command stand" will contain figures of an officer and musician -- but not any flags. The flags (or more appropriately, "colours") are mounted with their bearer by themselves on a full width (but often reduced depth) stand.
The position of this "colour stand" in relation to the rest of the unit determine's the unit's current cohesion:
- Good Order -- Colour stand is in front of unit, leading it
- Rattled -- Colour stand is in front line of unit -- often displacing command stand
- Disordered -- Colour stand is behind unit, facing front of unit
- Shaken -- Colour stand is also behind unit, but facing to the rear
- Broken -- Colour stand is several inches behind unit, routing away
Artillery is a bit of a different problem. Flags don't look right with artillery pieces . . . so I use a "Gun Captain". This is some sort of distinctive "artillery figure" mounted separately (rather than on the gun stand). His position (in front, beside, behind, etc.) can be used to show the current cohesion of the gun crew.
Note that those who object to flags with skirmishers may do a similar thing as long as it is clearly identified to your opponent.
Anyway, that's what I'm doing for Bluebear's "Tricorne Wars" . . . perhaps it will give you some ideas as well.
-- Jeff
Thursday, October 05, 2006
Saxe-Bearstein Uniforms --
As I have mentioned before, I am using SYW Hanover as my "guide" for my Saxe-Bearstein uniforms.
While I certainly do not expect to paint them all at once, I have posted a picture of what my infantry uniforms will eventually look like.
Note -- I've removed the picture since it turns out that the original line drawing apparently came from the baccus6mm.com website. Peter Berry of Baccus has asked me to direct people to his website's "How To" section where there are painting guides.
http://www.baccus6mm.com/index.php?content=howto
All of the uniforms pictured were actually used by Hanover except for two . . . well, one and a half. Since I've removed the graphic, you can no longer see it . . . but the coat color is RED with a variety of facing colors -- white, yellow, orange, light green, dark green, light blue, dark blue, lavender and black.
The "black" regiment actually had white turnbacks although the cuffs and lapels were black. The "lavender" regiment is fictional (but I didn't want to double-up on any colors).
As for cavalry, the "heavy cav" wore white uniforms with various "regimental colors" except for the grenadier guard cavalry, which wore red.
The Dragoons wore white as well . . . but I want them in something different . . . so I'm going to "cheat" and put my dragoons in yellow-brown coats.
As for the Hussars, well history gives me a very nice selection. The Luckner Hussars wore two completely different uniforms . . . and I shall use both, plus some frei corps Hussars if more are needed.
Anyway, that's the plan.
-- Jeff
Wednesday, October 04, 2006
Wars for Arcadian Glory --
As I have mentioned before, I'm located about halfway up Vancouver Island (off the west coast of Canada). The local gaming group is "The Arcadian Guild". (Check out the link to the right).
Myself and a few others are looking to start a campaign set in the mid-eighteenth century using imaginary European countries. My principality of Saxe-Bearstein is one of these countries. (See Archives for August 31 to check on Saxe-Bearstein's fictional history).
One of the purposes of this campaign will be to build-up armies. This means that we don't want to need too many painted troops too early. To begin with, each player will need one Brigade of Foot and one of Mounted, plus some generals and two pieces of artillery.
Using Bluebear's Tricorne Wars rules, this means a minimum of three battalions of foot (17 to 25 men each) and one unit of mounted (7 to 16 cavalry figures). There should be four more mounted figures (2 brigadiers, 1 major general and 1 aide-de-camp).
In addition, two artillery pieces (one Light, one Medium) are permitted, as are two more small mounted units (7 to 10 men each) and a unit of skirmishing foot (5 to 13 figures). These are suggested -- but not required.
Thus, if someone wanted to meet the bare minimums, that would mean 51 foot and 11 mounted; whereas, if they wanted the maximum, they would need 88 foot (including the skirmishers), 40 mounted and two artillery pieces plus 7 crew.
Campaign Concept
Since we hope to have a flexible number of participants in the "Wars for Arcadian Glory" (or WAG for short), I'm thinking of not tying us down to a fixed "map". Instead each unit will be tied to a "territory" (which could be an area or city).
When two players want to fight a battle, they would each roll a die to determine which "territory" of theirs was "at risk". In addition, they would roll up a random, unnamed territory (most of which will just supply another infantry unit -- but a few of which would allow more cavalry units to be built).
The winner of the battle keeps his territory and may select either the other player's "at risk" territory OR the new territory. In either case the loser gets the remaining territory (usually his own back; but occasionally a new one).
Whoever gets the new "territory" gets to name it. Whatever territory a player gets, he can raise troops from it (although it takes some time before he can use them). This means that you never lose your overall units -- and that your army will slowly grow.
In addition, battle winners have a better chance of recouping battle losses than do the losers. What I'm currently thinking is that all "full" or partially full companies and/or squadrons are restored to full health. Any stands that had been eliminated must be individually diced for. Winner of battle recovers 2/3rds of his troops (rolls a 3+); while the loser only gets about half of them back (rolls a 4 or better).
Over the Winter season, all of your units recruit themselves back up to full strength -- except those that you've "lost" (i.e., are now owned by an opponent) -- they cannot be re-built unless you recapture their home "territory".
However, any unit that has its "home territory" at risk (no matter which side currently owns it) gets a temporary morale rating of "elite" for that battle only (otherwise reverting to it's normal morale rating).
What I'm currently thinking is allowing a maximum of three or four battles per "campaign year" per participant. However, all armies who either did not fight or failed to win any battles, may still build one new unit over the winter.
If someone wins an "infantry territory", they would roll 1d3 and add one (generating a number from 2 to 4) . . . this is how many seasons before a "Raw" unit can be raised from that territory. If they wish to use the troops before then, they will be rated as "Militia" until they are successfully raised to "Raw" by their battle actions.
If someone wins an "mounted territory", they would roll 1dAv and add one (generating a number from 3 to 6) . . . this is how many seasons before a "Raw" unit can be raised from that territory. If they wish to use the troops before then, they will be rated as "Militia" until they are successfully raised to "Raw" by their battle actions.
After each battle, every unit that has captured a "standard" will get a roll to improve their morale grade by one. In addition, the winner of a battle gets to select one unit to roll for morale improvement; while the loser must select a unit to roll for lowering it's morale grade (which is how a "Veteran" unit could fall to "Poor" -- which is the same as "Raw", but disgraced.)
Winner of a battle may award a "Battle Honor" to up to 33% of the unit's participating in the battle. This doesn't really mean anything except that it builds up unit histories.
The above description is, of course, only a sketch, but hopefully it will give you some idea of how the "Wars for Arcadian Glory" will operate.
-- Jeff
Sunday, October 01, 2006
A Game at Murdock's --
 This Sunday I travelled up the coast to Murdock's game room to play a Napoleonic battle.
In preparation for an upcoming refight on the 200th anniversary of Auerstadt, we played the first part of the battle (until I had to head back in time to catch the ferry to get home).
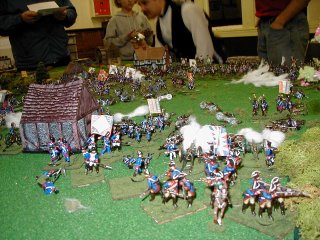
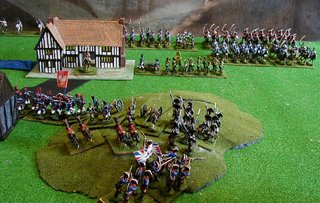
The first photo shows the scene when the fog lifted (from behind my French lines). You can just make out General Blucher in the town ahead of my position. I took a chance and managed to capture the town (and the General!) before the Prussians could occupy it.
 The next phot shows the game a few turns later when another French division faced far too many cavalry regiments (way, way too many). I held (and killed a lot of horses), but it wasn't a comfortable task.
We were playing a slight modification of the SHAKO rules . . . volatile and fun.
The final photo is again a couple of turns further into the game. This time looking down the Prussian lines as more and more troops flood onto the table.
 I would like to show you more pictures . . . but my digital camera let me down. I can see some more photos "in the camera", but I couldn't get them to download onto my computer.
I'm sure that Murdock will have more (and better) photos since he has a much better camera. His blog can be seen at:
http://murdocksmarauders.blogspot.com/
-- Jeff
 This Sunday I travelled up the coast to Murdock's game room to play a Napoleonic battle.
In preparation for an upcoming refight on the 200th anniversary of Auerstadt, we played the first part of the battle (until I had to head back in time to catch the ferry to get home).
The first photo shows the scene when the fog lifted (from behind my French lines). You can just make out General Blucher in the town ahead of my position. I took a chance and managed to capture the town (and the General!) before the Prussians could occupy it.
 The next phot shows the game a few turns later when another French division faced far too many cavalry regiments (way, way too many). I held (and killed a lot of horses), but it wasn't a comfortable task.
We were playing a slight modification of the SHAKO rules . . . volatile and fun.
The final photo is again a couple of turns further into the game. This time looking down the Prussian lines as more and more troops flood onto the table.
 I would like to show you more pictures . . . but my digital camera let me down. I can see some more photos "in the camera", but I couldn't get them to download onto my computer.
I'm sure that Murdock will have more (and better) photos since he has a much better camera. His blog can be seen at:
http://murdocksmarauders.blogspot.com/
-- Jeff
Subscribe to:
Posts (Atom)