The Grand Scheme --
Well, for now at least, here's what I'm planning.
I've got a bunch of RSM figures for my Saxe-Bearstein troops (note -- loosely based on SYW Hanoveran uniforms). I also have a whole bunch of very old SYW 25mm figures that I got at a convention flea market over 25 years ago.
They're what I call "small 25s". I'm not sure of the manufacturer, but they are certainly not up to the RSM standard . . . but I have around 450 foot and 100 cavalry of these figures.
Anyway, my hope is to encourage others in my area (northern Vancouver Island, BC, Canada) to build their own imaginary armies. One guy is pretty much set; but a couple of others will need to see troops on the table.
So, my current plan is to spray them with white primer (actually, several coats of white primer) and base them on the Austrian . . . excuse me, Eaglestein . . . forces. Since the nice thing about Austrians is that white is the dominant color so they won't take a horrible amount of finishing.
True, they won't look anywhere nearly as good as my Saxe-Bearstein troops, but that's partailly the point, isn't it?
-- Jeff
Being a record of an imaginary 18th century Germanic principality as relating to
the design and construction of a tabletop army for gentlemanly wargaming.
Sunday, September 17, 2006
Thursday, September 14, 2006
More Saxe-Bearstein Flags --
Not long ago (September 1 to be exact) I disclosed the basic infantry and cavalry flag patterns for my imaginary 18th century principality of Saxe-Bearstein.
Today I will continue with more of the unit flag styles I intend to use.
As before, the central image is of the Saxe-Bearstein red bear (paying homage to the original 14th century Swiss mercenary battalion that eventually founded the principality). The oval containing the bear has a background of the hat-tape color.
In the "corners" of the flags is the grapeleaf pattern honoring the fine beverages for which Saxe-Bearstein is so justly famous.
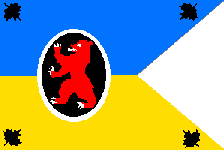 The first flag style is that of a Dragoon unit . . . and here I'm "cheating" a bit.
In general, I'm basing my units on a Hanoveran model; but historically both Horse and Dragoon units had white uniforms -- and I wanted them to be different from each other.
So I've decided that my Saxe-Bearstein Dragoons will be wearing "gold" coats in honor of the grain from which they brew their fine beers and ales. The blue in the flag means that their regimental color is blue.
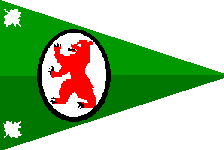 The next pair of flags represents a pair of Hussar units. Actually, they are used for the two different uniforms for Luckner's Hussars . . . but I'll use them as separate units.
The first uniform was green-over-green and the second red-over-white, so guess what the flags look like?
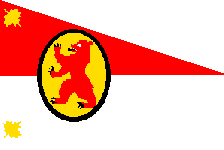 With all of the lace and frogging available on Hussar units (and no tricorns), I could basically choose the color of the background for the "bear oval".
It would be pointless to have a white-leaf-on-white, so it became gold . . . and therefor I chose white (as a contrast) for the first flag.
Those who read my post on the History of Saxe-Bearstein (August 31) may have noted that some time in the past (1509, to be precise), the neighboring valley of Saxe-Deerstein had been brought under the control of the von Ursa's Saxe-Bearstein.
While the two small nations have long been one, the Deersteinians do maintain their own proud tradition by wearing their own color coats and fighting under their own "colours" (the prancing deer).
If you are curious about this, just think -- it either allows me to use them as part of the same army OR as combatants against each other.
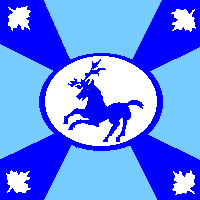 Just as with the Saxe-Bearstein flags, the color of the diagonal rays are the coat color; the "cross" color is that of the unit difference color; and the corner leaves and oval background are the button/hat tape color.
The final flag is, of course, for one of the Saxe-Bearstein foot battalions. They will have red coats; black trim and gold buttons and hat lace.
Even though these last two flags are quite similar, notice how different they look because of the axis of the central oval.
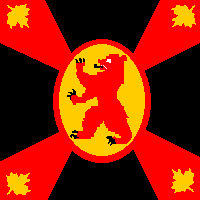
The particularly observant amongst you may notice that the "rays" are slightly wider than they were on the earlier flag models.
I decided that I wanted a bit more of the "coat color" to show, so I used a graphics program to widen them a touch.
-- Jeff
Not long ago (September 1 to be exact) I disclosed the basic infantry and cavalry flag patterns for my imaginary 18th century principality of Saxe-Bearstein.
Today I will continue with more of the unit flag styles I intend to use.
As before, the central image is of the Saxe-Bearstein red bear (paying homage to the original 14th century Swiss mercenary battalion that eventually founded the principality). The oval containing the bear has a background of the hat-tape color.
In the "corners" of the flags is the grapeleaf pattern honoring the fine beverages for which Saxe-Bearstein is so justly famous.
 The first flag style is that of a Dragoon unit . . . and here I'm "cheating" a bit.
In general, I'm basing my units on a Hanoveran model; but historically both Horse and Dragoon units had white uniforms -- and I wanted them to be different from each other.
So I've decided that my Saxe-Bearstein Dragoons will be wearing "gold" coats in honor of the grain from which they brew their fine beers and ales. The blue in the flag means that their regimental color is blue.
 The next pair of flags represents a pair of Hussar units. Actually, they are used for the two different uniforms for Luckner's Hussars . . . but I'll use them as separate units.
The first uniform was green-over-green and the second red-over-white, so guess what the flags look like?
 With all of the lace and frogging available on Hussar units (and no tricorns), I could basically choose the color of the background for the "bear oval".
It would be pointless to have a white-leaf-on-white, so it became gold . . . and therefor I chose white (as a contrast) for the first flag.
Those who read my post on the History of Saxe-Bearstein (August 31) may have noted that some time in the past (1509, to be precise), the neighboring valley of Saxe-Deerstein had been brought under the control of the von Ursa's Saxe-Bearstein.
While the two small nations have long been one, the Deersteinians do maintain their own proud tradition by wearing their own color coats and fighting under their own "colours" (the prancing deer).
If you are curious about this, just think -- it either allows me to use them as part of the same army OR as combatants against each other.
 Just as with the Saxe-Bearstein flags, the color of the diagonal rays are the coat color; the "cross" color is that of the unit difference color; and the corner leaves and oval background are the button/hat tape color.
 The final flag is, of course, for one of the Saxe-Bearstein foot battalions. They will have red coats; black trim and gold buttons and hat lace.
Even though these last two flags are quite similar, notice how different they look because of the axis of the central oval.

The particularly observant amongst you may notice that the "rays" are slightly wider than they were on the earlier flag models.
I decided that I wanted a bit more of the "coat color" to show, so I used a graphics program to widen them a touch.
-- Jeff
Wednesday, September 13, 2006
Basing for "Cavalry" Squadrons --
For the purpose of my rules, "Tricorne Wars", I have four types of "cavalry" squadrons.
There are two types of "Heavy Horse" and two types of "Other Horse".
I divide Heavy Horse, the "True" cavalry, into two types -- common and shock -- which I'm calling "Trotters" and "Gallopers".
 "Trotters" form the bulk of true cavalry in the 18th century. They may or may not have had armour, but they did use their pistols and they tended to charge more deliberately. The first diagram shows "Trotter" basing.
 "Gallopers" generally eschewed the use of pistols and preferred to close with cold steel at a rapid rate. The second diagram shows "Galloper" basing (with a distinct "wedge" formation).
Both of the above "Heavy Horse" are based more tightly (i.e., on a narrower base) than the two types of "Other Horse".
 "Dragoons" were originally "mounted infantry"; but by the middle of the 18th century were trained and used in much the same way as "true cavalry". They were, however, generally paid much less and mounted on more inferior horses.
Dragoon basing is illustrated in figure three. Note the wider element base and the central horse slightly behind the flankers.
Finally, the last type of mounted is "Light Horse". Typified by Hussars in their wonderfully colorful uniforms, but also including Cossacks, etc., "Light Horse" genreally operated in more open formations.
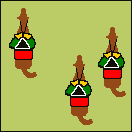 Figure #4 shows the basing style for Light Horse. While the base is the same width as that of the Dragoons, it is deeper and the figures are placed more irregularly.
It should be noted that both "Other Horse" types (both Dragoons and Light Horse) were often detailed to duties more in line with "campaigning" than the battlefield.
"Other Horse" provided scouts, screens and foraging . . . tasks considered beneath the more elite "Heavy Horse".
One of the aspects of my "Tricorn Wars" rule set is that all units have a chance of not showing up . . . or of showing up in limited numbers.
Regiments roll to see how many squadrons will show up. "Other Horse" rolls 1d6; but "Heavy Horse" takes the better of 2d6 to see how many squadrons actually make it to the battle (with a 1 meaning none show).
More on my rules over the coming weeks.
-- Jeff
For the purpose of my rules, "Tricorne Wars", I have four types of "cavalry" squadrons.
There are two types of "Heavy Horse" and two types of "Other Horse".
I divide Heavy Horse, the "True" cavalry, into two types -- common and shock -- which I'm calling "Trotters" and "Gallopers".
 "Trotters" form the bulk of true cavalry in the 18th century. They may or may not have had armour, but they did use their pistols and they tended to charge more deliberately. The first diagram shows "Trotter" basing.
 "Gallopers" generally eschewed the use of pistols and preferred to close with cold steel at a rapid rate. The second diagram shows "Galloper" basing (with a distinct "wedge" formation).
Both of the above "Heavy Horse" are based more tightly (i.e., on a narrower base) than the two types of "Other Horse".
 "Dragoons" were originally "mounted infantry"; but by the middle of the 18th century were trained and used in much the same way as "true cavalry". They were, however, generally paid much less and mounted on more inferior horses.
Dragoon basing is illustrated in figure three. Note the wider element base and the central horse slightly behind the flankers.
Finally, the last type of mounted is "Light Horse". Typified by Hussars in their wonderfully colorful uniforms, but also including Cossacks, etc., "Light Horse" genreally operated in more open formations.
 Figure #4 shows the basing style for Light Horse. While the base is the same width as that of the Dragoons, it is deeper and the figures are placed more irregularly.
It should be noted that both "Other Horse" types (both Dragoons and Light Horse) were often detailed to duties more in line with "campaigning" than the battlefield.
"Other Horse" provided scouts, screens and foraging . . . tasks considered beneath the more elite "Heavy Horse".
One of the aspects of my "Tricorn Wars" rule set is that all units have a chance of not showing up . . . or of showing up in limited numbers.
Regiments roll to see how many squadrons will show up. "Other Horse" rolls 1d6; but "Heavy Horse" takes the better of 2d6 to see how many squadrons actually make it to the battle (with a 1 meaning none show).
More on my rules over the coming weeks.
-- Jeff
Tuesday, September 12, 2006
Buildings for the "Old West" --
 For some reason I keep getting sidetracked away from my intention to write about my Seven Years War project.
Well, today I came across some photos I took of some "old west" building I built about a year ago.
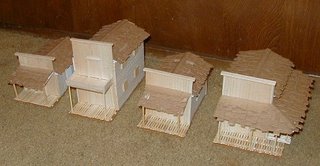
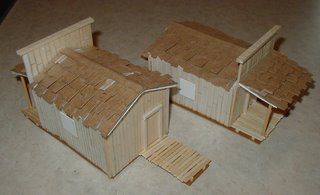
Picture #1 shows the four in a row. They are all slightly different shapes and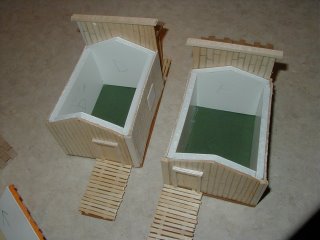 heights; and no two are alike (although two are pretty similar).
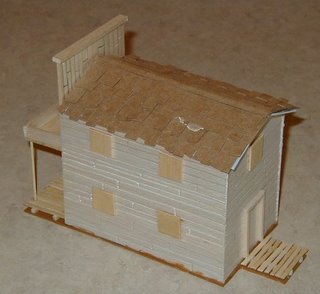
Picture #2 should give you an idea of how I constructed them.
First, I built the four walls of foamcore. I then glued thin sheet balsa to the four sides.
Then I traced and cut out a cardstock "base" for not only the building, but with a rear walkway to an outhouse and a front walkway.
I used an old dull pencil to scribe the psuedo-board shapes into the balsa.
The roofs were made of two pieces of cardstock held together with masking tape. This was then covered with "shingles". These were made while watching TV as I simply cut strips from cereal boxes and then clippped them into odd shapes.
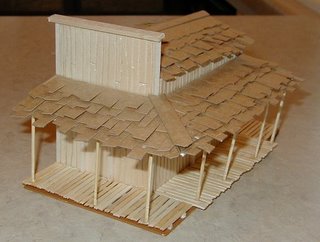
 As you can see from picture #3, I added strips of balsa trim around doors and on top of the "false fronts".
You can also see that I used strips of clipped-off "craft toothpicks" to create the walkways.
Pictures #4 and #5 show some two storey buildings. The first is a "hotel" with balcony; and the second, a corner saloon with a walkway around it.
All of these buildings were surprisingly simple to make. A little time-consuming, but really rather easy.
 One piece of advice though -- pre-planning is vital. For example, while the buildings are of differing sizes, I made sure that the fronts and sides were such that I could use standard sizes of balsa to clad them.
Oh, and if you ever wondered why so many "old west" buildings had those "false fronts" . . . it was because frequently all that was behind them was a big tent (and not a building at all).
Also, keep in mind that much of the "old west" was actually on the prairies where wood was in short supply.
Hopefully my next post will get back to the real focus of this blog -- the principality of Saxe-Bearstein and the Tricorn Battles of the "Wars for Arcadian Glory".
-- Jeff
 For some reason I keep getting sidetracked away from my intention to write about my Seven Years War project.
Well, today I came across some photos I took of some "old west" building I built about a year ago.
Picture #1 shows the four in a row. They are all slightly different shapes and
 heights; and no two are alike (although two are pretty similar).
Picture #2 should give you an idea of how I constructed them.
First, I built the four walls of foamcore. I then glued thin sheet balsa to the four sides.
Then I traced and cut out a cardstock "base" for not only the building, but with a rear walkway to an outhouse and a front walkway.

I used an old dull pencil to scribe the psuedo-board shapes into the balsa.
The roofs were made of two pieces of cardstock held together with masking tape. This was then covered with "shingles". These were made while watching TV as I simply cut strips from cereal boxes and then clippped them into odd shapes.
 As you can see from picture #3, I added strips of balsa trim around doors and on top of the "false fronts".
You can also see that I used strips of clipped-off "craft toothpicks" to create the walkways.
Pictures #4 and #5 show some two storey buildings. The first is a "hotel" with balcony; and the second, a corner saloon with a walkway around it.
All of these buildings were surprisingly simple to make. A little time-consuming, but really rather easy.
 One piece of advice though -- pre-planning is vital. For example, while the buildings are of differing sizes, I made sure that the fronts and sides were such that I could use standard sizes of balsa to clad them.
Oh, and if you ever wondered why so many "old west" buildings had those "false fronts" . . . it was because frequently all that was behind them was a big tent (and not a building at all).
Also, keep in mind that much of the "old west" was actually on the prairies where wood was in short supply.
Hopefully my next post will get back to the real focus of this blog -- the principality of Saxe-Bearstein and the Tricorn Battles of the "Wars for Arcadian Glory".
-- Jeff
Monday, September 11, 2006
Even More GNW Photos --
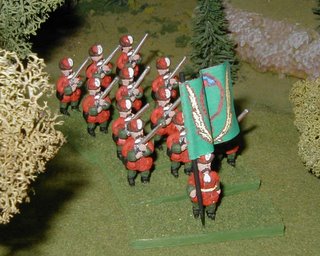 You guessed it . . . more photos of my Great Northern War figures.
These, sadly to say, are not from a game. Instead they were simply placed on some convenient terrain for pictures.
The first photo is of a Russian musketeer unit.
While the "traditional" Russian colors were green coats with red trim, many of the units at the start of the eighteenth century wore different colors.
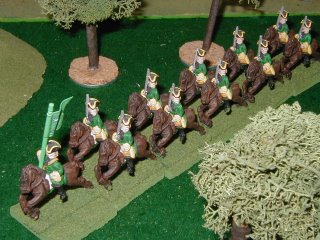 Many Russian units wore red (as in picture #1), blue and white as well as different greens.
Likewise, while everyone knows that Swedes always wore blue, there were exceptions.
Picture #2 shows a Swedish Dragoon regiment which was uniformed in green.
The next photo (#3) shows an artillery unit.
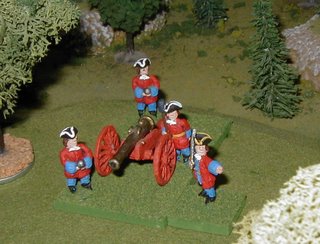 The three figures on the gun base tell me that it is a "medium" gun (4 to 9 pounder in my rules).
The single figure (with sword) is a "command" figure whose position is used to indicate the unit's current "cohesion".
Finally, the last unit pictured is a Swedish cavalry unit. Once again, the single figure leading the unit is a "cohesion" marker.
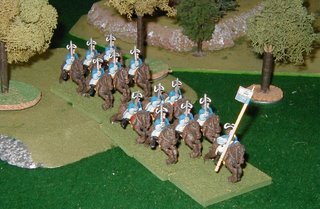 Remember, if you "click" on any photo, you will get to see a larger version of it.
Enjoy!
-- Jeff
 You guessed it . . . more photos of my Great Northern War figures.
These, sadly to say, are not from a game. Instead they were simply placed on some convenient terrain for pictures.
The first photo is of a Russian musketeer unit.
While the "traditional" Russian colors were green coats with red trim, many of the units at the start of the eighteenth century wore different colors.
 Many Russian units wore red (as in picture #1), blue and white as well as different greens.
Likewise, while everyone knows that Swedes always wore blue, there were exceptions.
Picture #2 shows a Swedish Dragoon regiment which was uniformed in green.
The next photo (#3) shows an artillery unit.
 The three figures on the gun base tell me that it is a "medium" gun (4 to 9 pounder in my rules).
The single figure (with sword) is a "command" figure whose position is used to indicate the unit's current "cohesion".
Finally, the last unit pictured is a Swedish cavalry unit. Once again, the single figure leading the unit is a "cohesion" marker.
 Remember, if you "click" on any photo, you will get to see a larger version of it.
Enjoy!
-- Jeff
Saturday, September 09, 2006
Some More GNW Pictures --
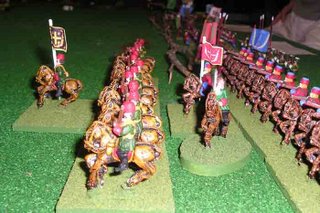 Well, due to several requests, I'm interrupting my "basing" posts to bring you some more pictures of my Great Northern War figures.
All figures are 25mm Blood Axe figures. These were made by Lance Runolfsson (not sure of that spelling) in Oregon. Unfortunately, I believe that he has retired from casting lead.
These photos are from the second playtest of my rules. The scenario was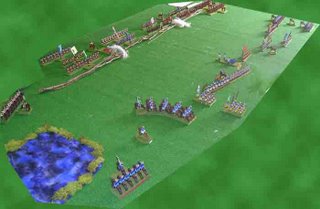 inspired by the Battle of Fraustadt in 1706, which featured Swedes attacking a mixed force of Saxons and Russians.
The first photo shows some of the Russian Dragoons who were stationed on the Allied left flank -- which is at the "top" of the second photo, which shows the overall look of the battlefield as action commenced.
Swedes are on this side of the photo; Saxons on the far side, towards the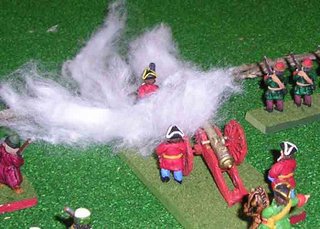 bottom of the photo; and Russians are near the top.
The next photo shows the battle as the forces closed with each other. Again, the Swedish forces are on this side. Please note the "curved" line of battalions. This was achieved because the rules I'm using allow for a "brigade line" . . . but such a formation rolls its movement for both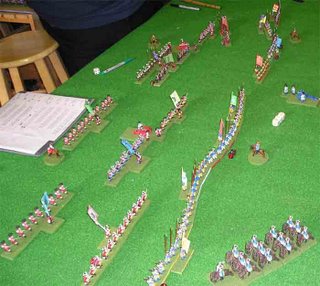 ends and the middle. This can create some (to me) more realistic-looking lines.
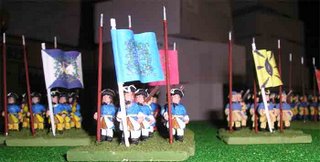
The final photo is from the first playtest and it shows some of the Swedish infantry units marching in column.
The flags are from Dan Schorr, whose "Northern Wars" website is a must for anyone interested in the Great Northern War.
The URL for his website is:
http://www.northernwars.com/
and I most heartily recommend it.
 I will post more photos sometime later, so keep checking back for more photos . . . who knows, perhaps next time I'll show you some of my Danes.
-- Jeff
 Well, due to several requests, I'm interrupting my "basing" posts to bring you some more pictures of my Great Northern War figures.
All figures are 25mm Blood Axe figures. These were made by Lance Runolfsson (not sure of that spelling) in Oregon. Unfortunately, I believe that he has retired from casting lead.
These photos are from the second playtest of my rules. The scenario was
 inspired by the Battle of Fraustadt in 1706, which featured Swedes attacking a mixed force of Saxons and Russians.
The first photo shows some of the Russian Dragoons who were stationed on the Allied left flank -- which is at the "top" of the second photo, which shows the overall look of the battlefield as action commenced.
Swedes are on this side of the photo; Saxons on the far side, towards the
 bottom of the photo; and Russians are near the top.
The next photo shows a Russian gun (the topmost puff of smoke) firing into the Swedish right.
The next photo shows the battle as the forces closed with each other. Again, the Swedish forces are on this side. Please note the "curved" line of battalions. This was achieved because the rules I'm using allow for a "brigade line" . . . but such a formation rolls its movement for both
 ends and the middle. This can create some (to me) more realistic-looking lines.
The final photo is from the first playtest and it shows some of the Swedish infantry units marching in column.
The flags are from Dan Schorr, whose "Northern Wars" website is a must for anyone interested in the Great Northern War.
The URL for his website is:
http://www.northernwars.com/
and I most heartily recommend it.
 I will post more photos sometime later, so keep checking back for more photos . . . who knows, perhaps next time I'll show you some of my Danes.
-- Jeff
Basing for Infantry --
When you really get down to it (as far as basing troops goes), there are really only three basic types of infantry in European mid-eighteenth century warfare -- regular troops, irregular troops and skirmishing troops.
The vast bulk of troops are "regular" troops -- that is trained "professional" soldiers. Now, since I really don't like the looks of single-ranked troops representing a "battalion", I wanted my troops double-ranked -- like this.
 And, while I basically selected "Koenig Krieg" style basing (four figures on a stand -- in two rows of two), I wanted larger units. Hence, in my rules, a battalion ranges from 16 to 24 figures (4-6 stands).
 Irregular troops, while sometimes acting in solid blocks (like regulars), needed to have a different look to them. Thus I decided upon a deeper base and a loose "diamond" formation for each "company" (four figures). Thus, they will look like this.
Now, for both the regular and irregular "line-type" troops, each stand of four figures represents a "company" (with 4-6 companies per battalion). However, I needed something different for "jaegers" and other true "light infantry".
In my opinion, such troops are generally afforded too much strength under most rule sets. True "light infantry", while very valuable on campaign, were of little real value on the battlefield. About the best that they could do was to occupy "bad ground" and delay opposing troops.
 Thus, while each base still represents a full company, only two figures (instead of four) are used. The rest are hiding , moving or reloading. Thus I'm using a base twice the width of a "regular" base -- but twice as wide.
My next post will probably be about my choices for basing mounted troops.
-- Jeff
When you really get down to it (as far as basing troops goes), there are really only three basic types of infantry in European mid-eighteenth century warfare -- regular troops, irregular troops and skirmishing troops.
The vast bulk of troops are "regular" troops -- that is trained "professional" soldiers. Now, since I really don't like the looks of single-ranked troops representing a "battalion", I wanted my troops double-ranked -- like this.
 And, while I basically selected "Koenig Krieg" style basing (four figures on a stand -- in two rows of two), I wanted larger units. Hence, in my rules, a battalion ranges from 16 to 24 figures (4-6 stands).
 Irregular troops, while sometimes acting in solid blocks (like regulars), needed to have a different look to them. Thus I decided upon a deeper base and a loose "diamond" formation for each "company" (four figures). Thus, they will look like this.
Now, for both the regular and irregular "line-type" troops, each stand of four figures represents a "company" (with 4-6 companies per battalion). However, I needed something different for "jaegers" and other true "light infantry".
In my opinion, such troops are generally afforded too much strength under most rule sets. True "light infantry", while very valuable on campaign, were of little real value on the battlefield. About the best that they could do was to occupy "bad ground" and delay opposing troops.
 Thus, while each base still represents a full company, only two figures (instead of four) are used. The rest are hiding , moving or reloading. Thus I'm using a base twice the width of a "regular" base -- but twice as wide.
My next post will probably be about my choices for basing mounted troops.
-- Jeff
Subscribe to:
Posts (Atom)